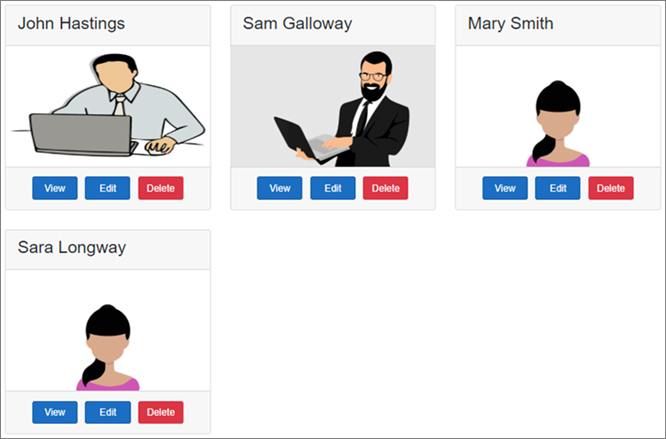
아래 그림과 같이 Employee 목록을 표시하는 방법입니다.

EmployeeList.razor
@page "/"
@inherits EmployeeListBase

<h3>Employee List</h3>

<div class="card-deck">
    @foreach (var employee in Employees)
    {
    <div class="card m-3" style="min-width: 18rem; max-width:30.5%;">
        <div class="card-header">
            <h3>@employee.FirstName @employee.LastName</h3>
        </div>
        <img class="card-img-top imageThumbnail" src="@employee.PhotoPath" />
        <div class="card-footer text-center">
            <a href="#" class="btn btn-primary m-1">View</a>

            <a href="#" class="btn btn-primary m-1">Edit</a>

            <a href="#" class="btn btn-danger m-1">Delete</a>
        </div>
    </div>
    }
</div>
코드 설명
@page "/"
@inherits EmployeeListBase
페이지 지시문의 단일 슬래시는 루트 애플리케이션 URL로 이동할 때 이 구성 요소를 렌더링하도록 지정합니다.
@inherits 특성은 이 구성 요소의 기본 클래스를 지정합니다.
<div class="card-deck">
    @foreach (var employee in Employees)
    {
        <div class="card m-3" style="min-width: 18rem; max-width:30.5%;">
            <div class="card-header">
                <h3>@employee.FirstName  @employee.LastName</h3>
            </div>

            <img class="card-img-top imageThumbnail" src="@employee.PhotoPath" />


            <div class="card-footer text-center">
                <a href="#" class="btn btn-primary m-1">View</a>

                <a href="#" class="btn btn-primary m-1">Edit</a>

                <a href="#" class="btn btn-danger m-1">Delete</a>
            </div>
        </div>
    }
</div>
각 직원은 Bootstrap 카드를 사용하여 표시됩니다. Employee 목록을 순환하기 위해 foreach 루프를 사용하고 있습니다.
// EmployeeListBase.cs
using EmployeeManagement.Models;
using Microsoft.AspNetCore.Components;
using System;
using System.Collections.Generic;
using System.Threading.Tasks;

namespace EmployeeManagement.Web.Pages
{
    public class EmployeeListBase : ComponentBase
    {
        public IEnumerable<Employee> Employees { get; set; }

        protected override Task OnInitializedAsync()
        {
            LoadEmployees();
            return base.OnInitializedAsync();
        }

        private void LoadEmployees()
        {
            Employee e1 = new Employee
            {
                EmployeeId = 1,
                FirstName = "John",
                LastName = "Hastings",
                Email = "David@pragimtech.com",
                DateOfBrith = new DateTime(1980, 10, 5),
                Gender = Gender.Male,
                Department = new Department { DepartmentId = 1, DepartmentName = "IT" },
                PhotoPath = "images/john.png"
            };

            Employee e2 = new Employee
            {
                EmployeeId = 2,
                FirstName = "Sam",
                LastName = "Galloway",
                Email = "Sam@pragimtech.com",
                DateOfBrith = new DateTime(1981, 12, 22),
                Gender = Gender.Male,
                Department = new Department { DepartmentId = 2, DepartmentName = "HR" },
                PhotoPath = "images/sam.jpg"
            };

            Employee e3 = new Employee
            {
                EmployeeId = 3,
                FirstName = "Mary",
                LastName = "Smith",
                Email = "mary@pragimtech.com",
                DateOfBrith = new DateTime(1979, 11, 11),
                Gender = Gender.Female,
                Department = new Department { DepartmentId = 1, DepartmentName = "IT" },
                PhotoPath = "images/mary.png"
            };

            Employee e4 = new Employee
            {
                EmployeeId = 3,
                FirstName = "Sara",
                LastName = "Longway",
                Email = "sara@pragimtech.com",
                DateOfBrith = new DateTime(1982, 9, 23),
                Gender = Gender.Female,
                Department = new Department { DepartmentId = 3, DepartmentName = "Payroll" },
                PhotoPath = "images/sara.png"
            };

            Employees = new List<Employee> { e1, e2, e3, e4 };
        }
    }
}
임의의 Employee 목록을 만들어주고 있습니다.
Blazor 구성 요소에는 몇 가지 수명 주기 방법이 있습니다.
OnInitializedAsync 는 가장 일반적인 수명 주기 메서드입니다.
Employee 데이터를 검색하기 위해 이 메서드를 재정의합니다.
다음 포스팅에서는 RESTful 서비스를 호출하여 데이터베이스에서 이 데이터를 검색하는 방법에 대해 알아보려고합니다.
MainLayout.razor
@inherits LayoutComponentBase

<div class="sidebar">
    <NavMenu />
</div>

<div class="main">
    <div class="content px-4 container">
        @Body
    </div>
</div>
Site.css
.imageThumbnail {
    height: 200px;
    width: auto;
}
스타일링을 위해 @Body가 포함된 요소에 부트스트랩 컨테이너 클래스를 포함합니다.
프로젝트에 사용된 이미지는 아래의 이미지를 다운 받아 사용하세요


